Sunday, February 22, 2009

Mood: impish

Yesterday I attended the Washington Wildlife Rehabilitation Association's Fifth Annual Washington Wildlife Rehabilitation Conference. While not an wildlife rehabber myself, I am very interested in the community--they have a wealth of good experience and knowledge, and they are definitely on the side of the angels in their work to help wildlife. I want to direct a significant part of my future anatomy informatics research toward developing tools for them to be able to share, organize, and find that information as seamlessly as possible.

The program was crammed full of good information, and I have a lot of biomedical and behavioral information to process into usable form, and many new contacts to follow up on. They ended on a fun and useful note, with a workshop on raptor imping, or feather repair for Washington birds of prey, such as hawks and owls. It's kind of like a hair transplant for avians, but it's much more practical than cosmetic--it can make a lot of difference in flight stability, which itself can be a decisive factor in deciding whether or not a bird is ready for re-release into the wild.


I hasten to reassure Washington hawks, owls, pelagic birds, and others that I have no intention of actually practicing on real birds any time in the near future! For me, it was an opportunity to learn some non-mammalian anatomy, and--more important--to get a hands-on opportunity to see how wildlife rehabbers gain, process, and share new information with applied (clinical) relevance, in order to incorporate those observations into some future way of information-sharing. I appreciate Mike's (the instructor) taking his time and materials to provide the instruction and practice, and WWRA for providing the venue and opportunity to take the workshop.


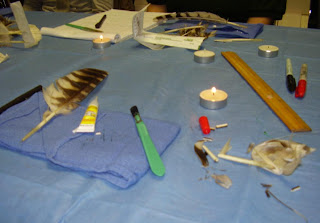
In real life, of course, you'd be carrying out this procedure on a live bird in rehabilitation; we practiced on isolated feathers instead. As good an idea as that sounds in theory, you'll also see its wisdom borne out in practice as the workshop unfolded. Below, in the bottom right quadrant of the photo, you see my broken feather (a left #10 primary from a barred owl, to be precise) on the left, and a replacement left #10 primary feather from a different barred owl on the right.


By the time I had taken this photo, I had already separated the calamus of the broken feather (left) from its vane (center). If this were a real-life situation, the calamus would still be attached in the follicle of the feather in the bird, who would be restrained or anesthetized, lying there while the procedure is carried out. The replacement feather (right) has not yet had the calamus separated from the vane, which will be the next step.

That's where the tea candles you see in the picture come in--if you take the time to heat the scalpel blades thoroughly in the flame, then there's no slicing or sawing through the shaft. The warm blade cuts through the quill like butter.

Fortunately, Mike stepped us through it patiently, because at a conceptual level, I was not sure I understood what had to happen to what in what order. There seemed to be a similar concern elsewhere in the room--I heard people doubting whether they could do this. After all, the animal's welfare is the primary concern, and they (and I) do not want to screw that up. But the people in the room, other than me, carry out other difficult procedures to help injured and recovering wildlife every day, and I had no doubt that the rehabbers who want to go on in imping will do so successfully, after some practice.

Below the calamus has been separated from the vane in both feathers, and in the left of the field, the calamus of the broken feather (still embedded in the follicle of the live bird, remember!) is roughly lined up with the vane of the replacement feather. Notice how I've been moving the calamus around in the photos to get a comfortable alignment for me--in real life, that poor bird would not need to be rotated so much and so often; part of this skill, I think, must be learning where things need to be, and setting them up that way at the start.

The calamus of the replacement feather and the vane of the broken feather are at right, and can be discarded, except I am going to try to use the shaft of the broken feather as the bridge for my imping.


Success! Or, at least, half-success; I still have to do the same thing for the calamus.

The bridge slides in to the shaft of the vane, and fits snugly--there is no looseness or rattling around, which will have an adverse effect on the success of the imping.
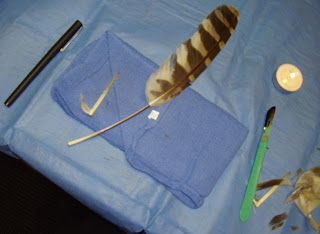


At this point, I am feeling rather pleased with myself, although I am concerned about how long it is taking me, with my "patient" either restrained or under anesthetic. Birds, after all, stress out very easily; I think that developing skillful speed must be an important component of this.

Other people in the room are having similar concerns; from somewhere, I hear the following exchange:

"Oh, no; we took too long--the patient just died!"

"Well, check and see whether he's a feather donor."

My bridge to the calamus was not quite as successful as to the vane; it was a little floppy. But the workshop was winding up, so I didn't have time to start a whole new bridge. For the sake of practice, I went with this one, and now that the bridges were in place, it was time to bind them permanently.

We had had a discussion at the beginning of properties of glue; epoxy actually seems to be the best choice, although sea water can cause some kinds to lose their integrity. The choice of glue is a non-trivial question, in other words, but for the sake of a practice workshop, Mike chose SuperGlue because it's cheap and fast.


I already had a certain amount of doubt about the safety of birds, blades, and flames around my motor skills; accidentally SuperGluing a bird's wing together seemed to me like a real risk to be avoided, and I promptly proved the point by SuperGluing my right ring finger and pinky into kind of a mirror-image "OK" sign (or "Arschloch" sign, if you're a German-speaker.) Ironically, if I were a pterosaur, I would have just totally subverted the entire imping procedure, since while bats fly on their fingers, and birds fly on their arms, in pterosaurs, "the ring finger is the wing finger" (I'll attribute that quote if I can find where I heard it), so I had just taken out my entire wing.

"Help", I said softly to Mike, who sized up the situation, pulled my hand up over my head like the referee does a boxing champ, and announced, "Can I have everyone's attention, please? Don't do this." (waving my hand). Fortunately, one of the rehabbers was also an experienced mom, who has obviously lived the SuperGluing fingers together scenario before. With warm water, a pen to gradually work the fingers apart, and a minimum of drama, we got it under control.


My results, while not perfect, were actually not bad for a first attempt, although as said above, it took a very long time. Below are pictures of my imped feather.


I did not get to keep my imped feather, as this is an area where Federal law, tribal law, endangered species, and freedom of religion all intersect, sometimes quite contentiously, and there is a lot of paperwork involved to make sure that everyone is cleaner than Caesar's wife about the use of raptor feathers. Mike and WWRA have the required permits, and can put on the workshop, but to transfer the feathers to us, who do not all have those permits, is a ton of effort, accounting, and documentation that we did not go to.

I totally had a blast, I learned something about avian anatomy, and more about the rehab community and how they gain, share, and use clinical information. All in all, a day very well-spent.

These are very good people, and they do important work to help animals. I invite you to support your local wildlife rehabber, as well as local and national wildlife rehab organizations: the National Wildlife Rehabilitators Association and the International Wildlife Rehabilitation Council. Locally, I am going to donate my time and money to WWRA, and I invite my readers (both of you! :) to do likewise.

Labels: , , , , ,


Read more!

Saturday, December 27, 2008

Soapmaking and cedar II: Progress and evaluation

So I'd have to give my efforts with the glycerine soap and cedar oil a C at best--it was a creative idea to try to apply the lesson in making cedar oil, but it was very lazy not to look up whether glycerine was hydrophilic or hydrophobic, so that kinds of cancels out the creativity.

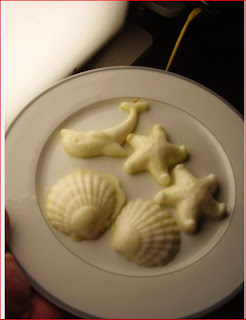
It wasn't a total loss, however--very little cedar oil actually got lost, and Mr thalarctos actually likes the pure-glycerine-and-nothing-else soap. I have lots of varieties of scented and colored soap in the shower that I like to combine for a different experience each time, while he's a pure Ivory-soap type of guy. Unfortunately, he has a number of allergies--he phoned me from the allergist's office after taking a series of tests to announce that, really, he was only allergic to two things: "food" and "nature". So soap with no scent or color suits him just fine, and he's already burned through the dolphin, starfish, and seashells I made.


Clearly, the results of the first batch showed that a change of course was called for. Learning that glycerine was indeed hydrophilic implied that a water-based herbal infusion would work better, so instead of dropping the lavender I had chopped up into the oil I was planning to infuse it in, I brewed a lavender tisane instead.

"Tisane" is nothing more than the strictly correct word for what is often called "herbal tea". Since herbal teas usually don't contain any Camellia sinensis, or tea plant, "tea" is, strictly speaking, a misnomer. But they're marketed as "herbal teas", and I did have some "peppermint tea" lying around, so I made a peppermint tisane as well to continue making glycerine soap with water-based herbal infusions.

These worked out much better!

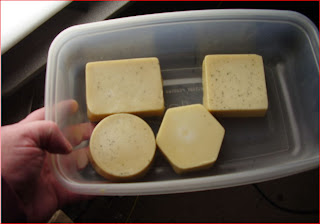
The peppermint tisane was much more effective than the lavender one at imparting color to the soap--below is the first batch of peppermint soap, and you can see that it is definitely more yellow-green than was the pure glycerine.


Which totally makes sense--the tisane dissolved in the glycerine, and so the color and scent was evenly distributed in the resulting soap.

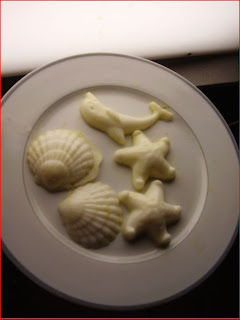
By contrast, the lavender soap (the embossed designs, while the peppermint is plain flat surfaces), came out much paler in color.


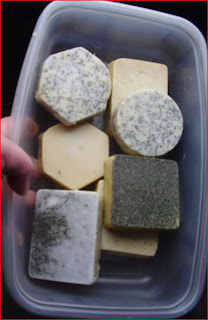
So this batch was definitely more of a success. There is room for improvement, however--while the color is pretty even, the herbal material itself is fairly unevenly distributed--it settled out, as you can see in the following photo.


So, goals for next time--a cedar tisane, in order to make my cedar soap successfully, and a solution to the problem of the herbal material settling out unevenly.

Labels: , , , ,


Read more!

Friday, December 26, 2008

Soapmaking and cedar I: Adventures in organic chemistry

In connection with the multidisciplinary and multi-institutional initiative with Northwest Indian College to incorporate the use of traditional native plants and foods into addressing diabetes, the Seattle Art Museum hosted a tour of the exhibit S'abadeb ("Radiant Gifts" from artists of the Salish peoples of the Northwest Coast and Puget Sound area), and a tour of the native plants at the garden at the Olympic Sculpture Park.

One of the activities when we got back to the building was making cedar oil. The instructor had already harvested small cedar branches, and she put us to work cutting the needles into small pieces--the smaller the better, since that exposes more surface area. That was pretty much all we had time for at the end of a full day of activities, so she sent us home with instructions for making an infusion of cedar oil from cut needles.

I went out and got some cedar needles of my own and cut them into small pieces for simmering. However, my cedar was very young, and smelled more astringent than the cedar she had provided, so I was not sure how this was going to work.

As she had described, I covered the cedar needles with about 1/2" of extra-virgin olive oil, and turned it to "low" to simmer. "Low" turned out to be too low to keep it warm enough, so later on, it spent most of the time on "medium-low", which provided a nice steady simmer.

The house smelled nice and cedary for the next week, as I kept it on simmer whenever I was home in the evening. I had asked previously if I needed to do anything special when I turned it off to go to work in the daytime. Obviously, traditional ways of cooking and creating oils didn't use to have to accommodate the 9-5 (or later); in fact, long ago in Navajo class, our teacher mentioned the effect that had on people's ability to attend days-long ceremonies, and how it was modifying traditional practice. But there was no need to do anything more than cover it and leave it on the stove; it wasn't going to go rancid as a result.

Oil goes rancid when it oxidizes; the point of simmering it for a week is to get all the water in the plant material to evaporate, so that it can't promote oxidization of the long hydrocarbon chains in the oil. After a week of simmering, a good deal of the astringent smell of the young cedar had disappeared, so I'm guessing that a large part of that quality was water-borne as well.

After the week was up, I strained the needles out of the infusion, and had about a cupful of strongly cedar-scented oil:


It was nice, but I wanted to craft more than just oil, so I decided to break out the soapmaking supplies I had recently gotten. There are several ways of making soap; the traditional and most labor-intensive way involves a chemical reaction between a strong base (usually lye) and fats, releasing a lot of heat and corrosiveness (we actually melted a thermometer at Terry's house making soap once!), so until I have a better workspace, I'm going with the less dramatic melted-glycerine method.

Melted glycerine soapmaking is pretty much what it sounds like--glycerine is a white solid; you melt it, add colors and scents that you want for the soap, and pour it into a mold to set. I decided cedar oil soap would be a nice thing to make, and set about mixing my fresh cedar oil into the melted glycerine.

This is how the first batch of soap came out.


Can you see my mistake yet?

It's basic organic chemistry--I had not bothered to look up glycerine to see whether it was hydrophilic or hydrophobic; I just assumed that--like the olive oil--it was hydrophobic.

Hydrophilic and hydrophobic (as in "rabies" :) are physical properties of molecules, referring to their distribution of electrical charge. Very briefly, and probably criminally oversimplified, if a molecule has a positive charge at one end and a negative charge at the other, it tends to dissolve in other polar solvents, such as water, and is said to be "hydrophilic". Similarly, if a molecule does not have charged ends in that way, such as the long hydrocarbon chains in oils, then it tends to dissolve in non-polar solvents such as oils, but not in water, and is said to be "hydrophobic". This is, by the way, why oil and vinegar don't mix; vinegar is polar (hydrophilic) and oil is hydrophobic.

You see how the oil in my soap pieces is collected in spots, with lots of white glycerine in between? That means that the oil did not dissolve in the glycerine, as I had planned/hoped/expected it would.

Sure enough, wiki-ing "glycerine" yielded the following information, dammit:

Glycerol has three hydrophilic hydroxyl groups that are responsible for its solubility in water and its hygroscopic nature.


Had I bothered to look that up before just plunging in, I would not have wasted some of my cedar oil. And the soap came out pure glycerine, as all the cedar oil floated to the top and washed away (you can also see where I overfilled one of the seashells, and it ran over, erasing the boundary--note to self: even if I have a little left over, don't try to cram it all in, because that doesn't work). Oh, well, lesson learned.


Knowing belatedly that glycerine is hydrophilic, I switched to water-based herbal infusions, which worked out a lot better. I'll show how those turned out in the next post, as this one is getting quite long.

Labels: , , ,


Read more!

Sunday, April 06, 2008

Bearrings

(Emma, Ruth, if you're reading this, stop! Wait until your packages arrive this week before reading any further, 'k? :)


Finished my first pair of bear earrings ("bearrings") tonight. These are learning pieces, so I'll give them as gifts to friends.

Terry brought the golden bears back from the bead show in Arizona a few weeks ago. I'm using the colors pink, blue, and yellow because of what they mean in reproductive cycle cytology--pink is acidophilic cells, blue is basophilic cells, and yellow is keratinized.

Also, since we want baby bears, not to lock them into rigid sex roles or anything, but pink and blue are well-established baby colors, too. So the colors of the beads in these bearrings have a lot of symbolism.

Labels: , , , , , , ,


Read more!

Sunday, September 30, 2007

A living national treasure

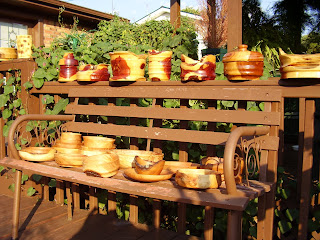
So now that Dad's retired, he's got more time to pursue his craft of making wooden bowls.


He's learned from many sources, and one of them is actually a living national treasure---William McClure makes Appalachian bowls, and has one in the Smithsonian.

Dad took me and Mom out to meet him and his wife. They're a sweet old couple, with a house full of crafts. I think they said he's 82 years old; I'll verify that when I get home. They were very welcoming, even though we had dropped in on them with no warning--they are very hospitable, and seemed to enjoy the company.

Dad played a little practical joke when he introduced me--he said he'd brought his city-girl daughter-in-law over to meet him, "because she didn't believe there were any Democrats in this county". He laughed delightedly, sprang over to a nearby table, and snatched up a photograph to show me. Laughing and wheezing through his emphysema, he showed me a picture of Bill Clinton shaking his hand at a reception, and said, "Two...Slick Willies!".

This is Dad and Mr. McClure, Mrs. McClure, and Mom:


Then we moved outside, and he and Dad swapped stories for a while.


More later; I've got to get ready to go to the airport now. In the meantime, here are some of Dad's bowls.

Labels: , , ,


Read more!